
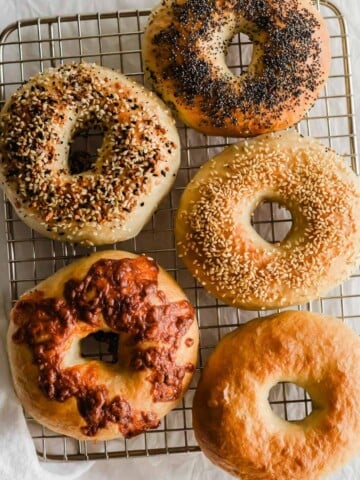
This recipe for Homemade Bread Bowls is a fun and whimsical way to serve your favourite soup, stews or chili. The best thing is that you can also eat the bowl afterward!

Want to save this recipe?
Enter your email & I'll send it to your inbox. Plus, get great new recipes from me every week!
What is a bread bowl?
A bread bowl is simply a large crusty bun, with the top cut off and hollowed out so that it can hold soup, stew, or chili.
Why you'll love this recipe
This recipe is easy to make and is adapted from my Everyday Pizza Dough.
The dough is shaped into large balls and baked in the oven.
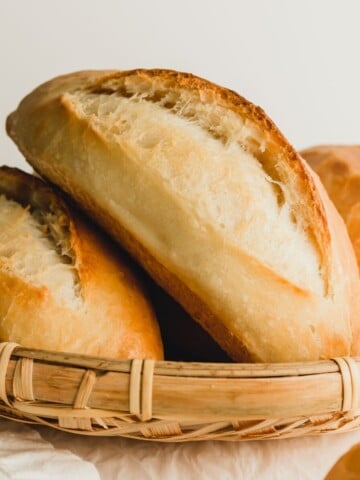
The resulting 4" bread bowls are soft, yet sturdy and not too crusty.
You can make the buns ahead of time and freeze them for later.
You'll only need a few ingredients.
Ingredients you'll need
- 1 batch pizza dough
- all-purpose flour or bread flour
- warm water
- active dry yeast
- granulated sugar
- sea salt
- olive oil
- egg white: for egg wash

How to make the bread bowls
Make the dough according to the recipe:
- Combine yeast and sugar into a bowl with ½ C (125ml) lukewarm water.
- Give it a stir and set aside until yeast is bubbly and active.
- Add flour and salt into the bowl of a stand mixer fitted with a dough hook attachment.
- While the mixer is running, add the activated yeast mixture, remaining water (you may not need all of it) and olive oil and mix until the dough forms smoothly into a ball.
- Note: If the dough appears too sticky, add additional flour, and if it's too dry, add a little water, 1 tablespoon at a time. This dough can be quite moist, so add a little at a time.
- Knead until dough is smooth and shiny, about 7-8 minutes in the mixer.
- Place the dough into a lightly greased bowl, cover with a towel and place in a warm place to double in size, about 1 hour, depending on how warm your kitchen is.
Preheat oven to 400F.
Once dough is risen, deflate the dough and divide into 5 equal dough balls.
Shape the dough ball into a round, and flatten slightly.
Place the dough ball onto a large baking sheet lined with parchment paper, leaving ample space in between each bun.
Repeat with the remainder of the dough.
Loosely cover with plastic wrap and place in a warm location, until slightly puffy.
Lightly brush the top of the bread bowls with egg white.
Bake at 400F for 15-18 minutes, or until lightly golden brown in colour.
Remove the baking tray from the oven.
Let the bread cool before cutting into them.
Once cool, use a sharp knife to cut the top of the bun.
Remove the top crust of the bun and use a spoon to hollow out the inside of the bread bowl.
Fill with your favorite soup, stew, chili, or dip.

How to serve
Cut the bread bowls just before serving.
Use the bread bowls to serve your favorite soups, stews chili, or dips.
Try:
- clam chowder
- fish chowder
- bean chili
- beef stew
- tomato soup
- wild rice & mushroom soup
- chicken pie filling
- kabocha soup
You can use the pizza dough and turn them into calzones, stromboli, or hamburger buns.
How to store
Store the baked Homemade Bread Bowls (uncut) in an airtight freezer bag or container at room temperature for up to 3 days.
You can also freeze them for up to 1 month, well wrapped in an airtight container or freezer bag.
Expert tips & FAQs
Once cut, the bread will start to dry out, which is why it's best to only cut and hollow out before serving.
Save the insides and place onto a baking tray. Toast the bread up and make homemade breadcrumbs, which can be used for coating fried pork tonkatsu, or Korean hot dogs.
For larger bowls (bigger than 4"), you can divide the dough into 4 instead of 5.
For smaller bowls, you can divide the dough into 6 equal balls -- these will be closer in size to large hamburger buns.
To make more bread bowls, you can double the batch of dough.
For a crustier bread, you can spray the tops of the buns with water before baking and bake at a higher temperature, similar to making baguettes.
Can I make the dough ahead of time?
You can either place the dough into the fridge to slow down its fermentation, or freeze the dough.
If you've placed the dough into the fridge, take it out 2 hours prior to baking to allow it to warm up at room temperature.
If you've frozen the dough, you'll need to defrost the dough overnight in the fridge and then bring it to room temperature.
Do the bread bowls get soggy?
Over an extended period of time, the bread does eventually absorb some moisture from the liquid.
For the most part, the bread will sustain its structure.
To prevent the bread from getting super soggy, you can bake the bread on a pizza stone on the lowest rack, which will give it a harder bottom crust.
Can I make it with sourdough?
You can certainly use your favourite sourdough recipe and shape them into little boules for a similar effect.

Other bread recipes you may like
Be sure to check out these recipes:
Cheese Breadsticks (Grocery Store Bakery Copycat)
Everyday Artisan-Style Crusty Loaf (No-Knead)
Let me know if you try out this recipe -- tag me on Instagram @siftandsimmer or leave me a comment/rating below!


Homemade Bread Bowls
For accuracy and precision in baking recipes, use weight (metric) measurements when available.
Ingredients
- 1 batch pizza dough
- 1 egg white for egg wash
Instructions
For key visual process steps, refer to the body of the blog post.
Make the dough:
- Combine yeast and sugar into a bowl with ½ C (125ml) lukewarm water.
- Give it a stir and set aside until yeast is bubbly and active.
- Add flour and salt into the bowl of a stand mixer fitted with a dough hook attachment.
- While the mixer is running, add the activated yeast mixture, remaining water (you may not need all of it) and olive oil and mix until the dough forms smoothly into a ball.
- Note: If the dough appears too sticky, add additional flour, and if it's too dry, add a little water, 1 tablespoon at a time. This dough can be quite moist, so add a little at a time.
- Knead until dough is smooth and shiny, about 7-8 minutes in the mixer.
- Place the dough into a lightly greased bowl, cover with a towel and place in a warm place to double in size, about 1 hour, depending on how warm your kitchen is.
- Preheat the oven to 400°F/204°C.
- Once dough is risen, deflate the dough and divide into 5 equal dough balls.
- Shape the dough ball into a round, and flatten slightly.
- Place the dough ball onto a large baking sheet lined with parchment paper, leaving ample space in between each bun.
- Repeat with the remainder of the dough.
- Loosely cover with plastic wrap and place in a warm location, until slightly puffy.
- Lightly brush the top of the bread bowls with egg white.
- Bake the buns at 400°F/204°C for 15-18 minutes, or until lightly golden brown in colour.
- Remove the baking tray from the oven.
- Let the bread completely cool before cutting into them.
- Once cool, use a sharp knife to cut the top of the bun.
- Remove the top crust of the bun and use a spoon to hollow out the inside of the bread bowl.
- Fill with your favorite soup, stew, chili, or dip.
Notes
Nutrition
The nutritional information provided should be considered as approximate and is not guaranteed. Please use your best judgment to ensure food is safely prepared and/or a good fit for your diet.


Ben | Havocinthekitchen
Great idea! The bread bowls that you can find in our local grocery stores are super huge - just gigantic, and thus, not convenient at all. And it never occurred to me you can make homemade of whatever size you need. I can imagine serving this with some hot cheesy dip or something like that.
Michelle
Ah yes, the bread bowls at the grocery store are really large -- I guess it's good for a communal soup bowl, but maybe not for individual servings. Hot cheesy dip would be a fantastic way to use them. Thanks Ben!
David @ Spiced
There is something magical about being able to eat your dishes. 🙂 I do love a good bread bowl - it really takes soup up a notch. I'm definitely hanging on to this recipe for the next time we serve soup to company!
Michelle
It really adds such a fun element when you can eat your serving dish! 🙂 Thanks David!
Linsey
It looks so gorgeous and it is amazing that it can hold the soup without leaking. I'll give it a try. Thanks Michelle!
Michelle
Yes, these soup bowls definitely pass the leak test -- fill them up with your favourite soup! Thanks Linsey 🙂
Healthy World Cuisine
It's difficult to find the right size of bread bowl at the market so thanks so much for this just in time recipe. March weather is damp and cold and perfect weather for soup. Love using the lid as a dipper.
Michelle
Thanks Bobbi, the lids are great for dunking into the soup! Definitely soup weather around here, stay warm!
Neil
Love your homemade bread bowls recipe Michelle! These would be excellent for serving my homemade clam chowder in, rather than shop bought bread bowls. I must stop being lazy and buying them and try making my own. Thanks for the inspiration!
Michelle
Thanks so much, Neil! Clam chowder is my personal favourite in these bread bowls 🙂
Raymund | angsarap.net
I love the idea of being able to eat the bowl after enjoying my soup or stew. The recipe seems easy to follow, and I appreciate that it's adapted from Everyday Pizza Dough. I think it's great that you can make the buns ahead of time and freeze them for later use. I also like that you only need a few ingredients to make these bread bowls. I can't wait to try making them myself! Thanks for sharing this recipe.