
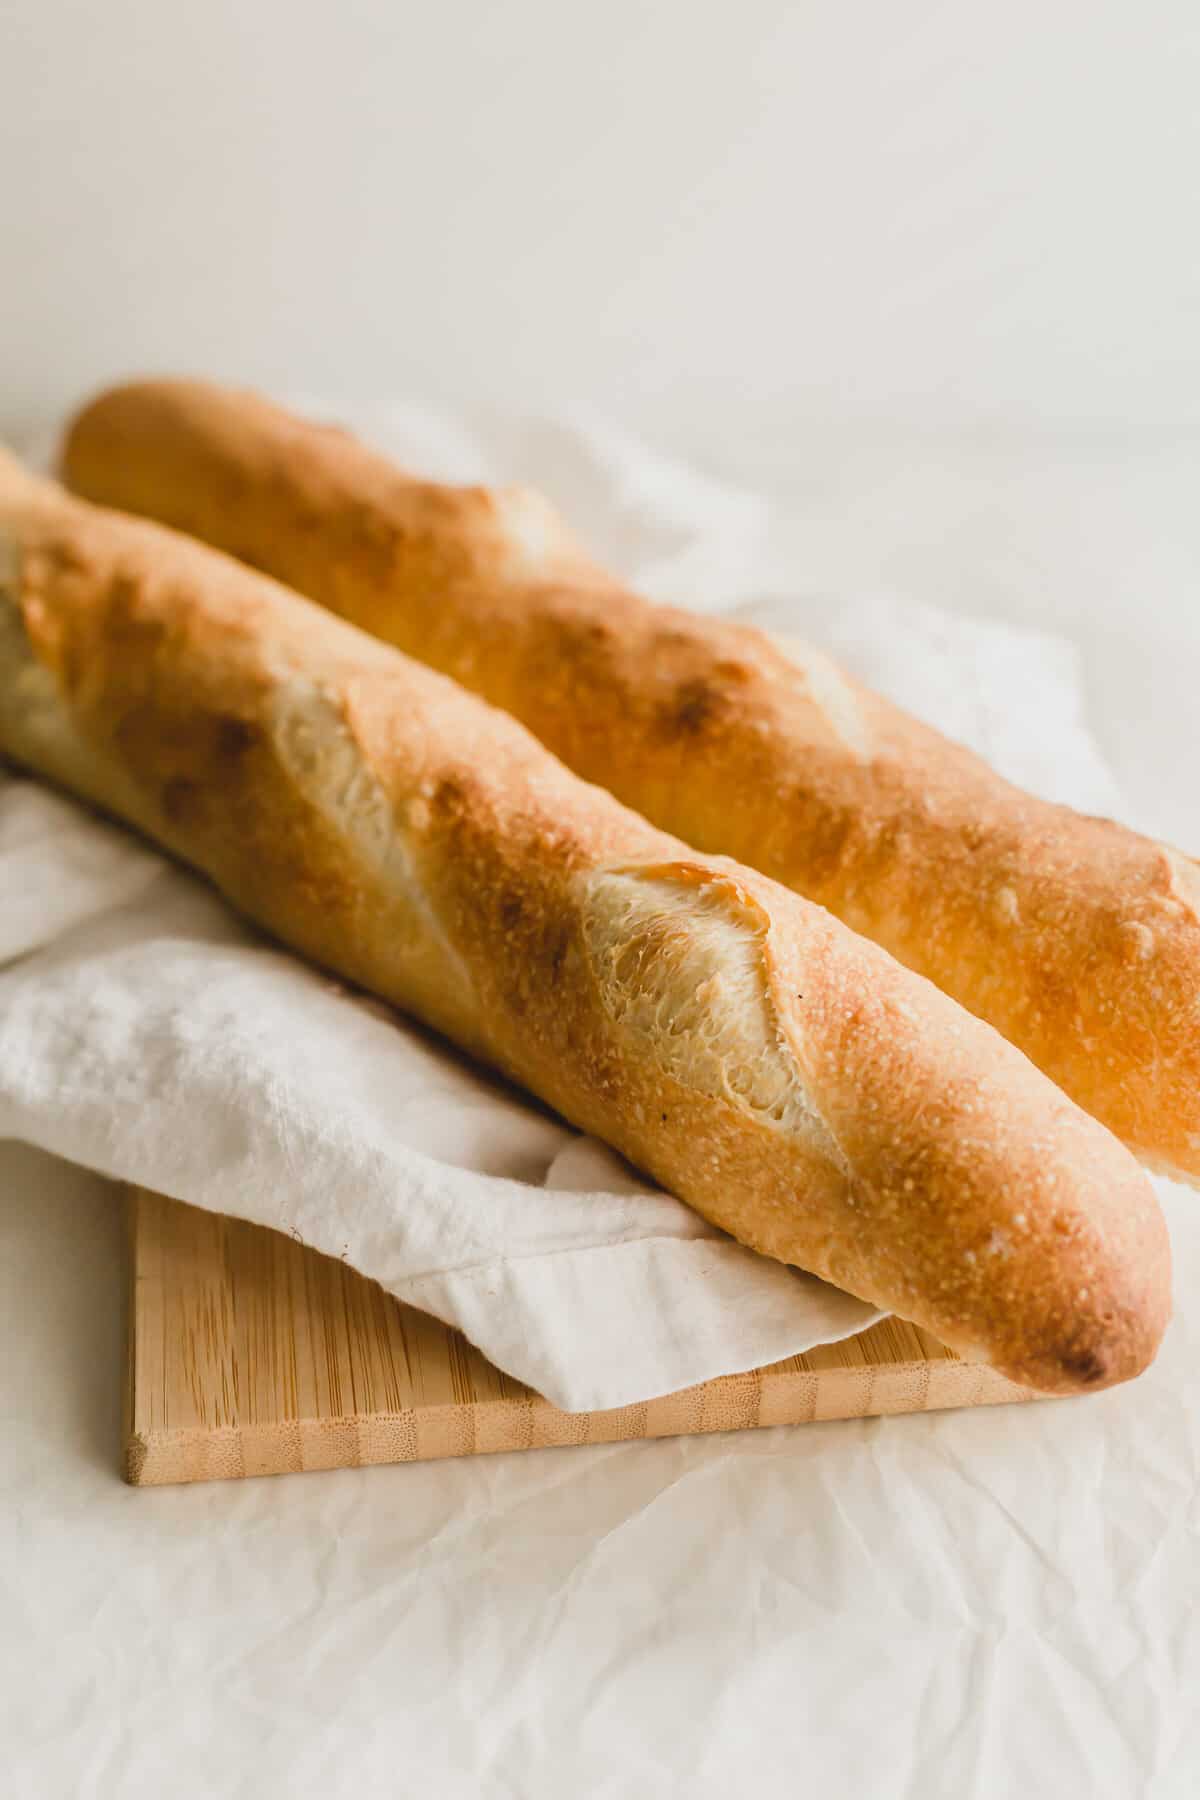
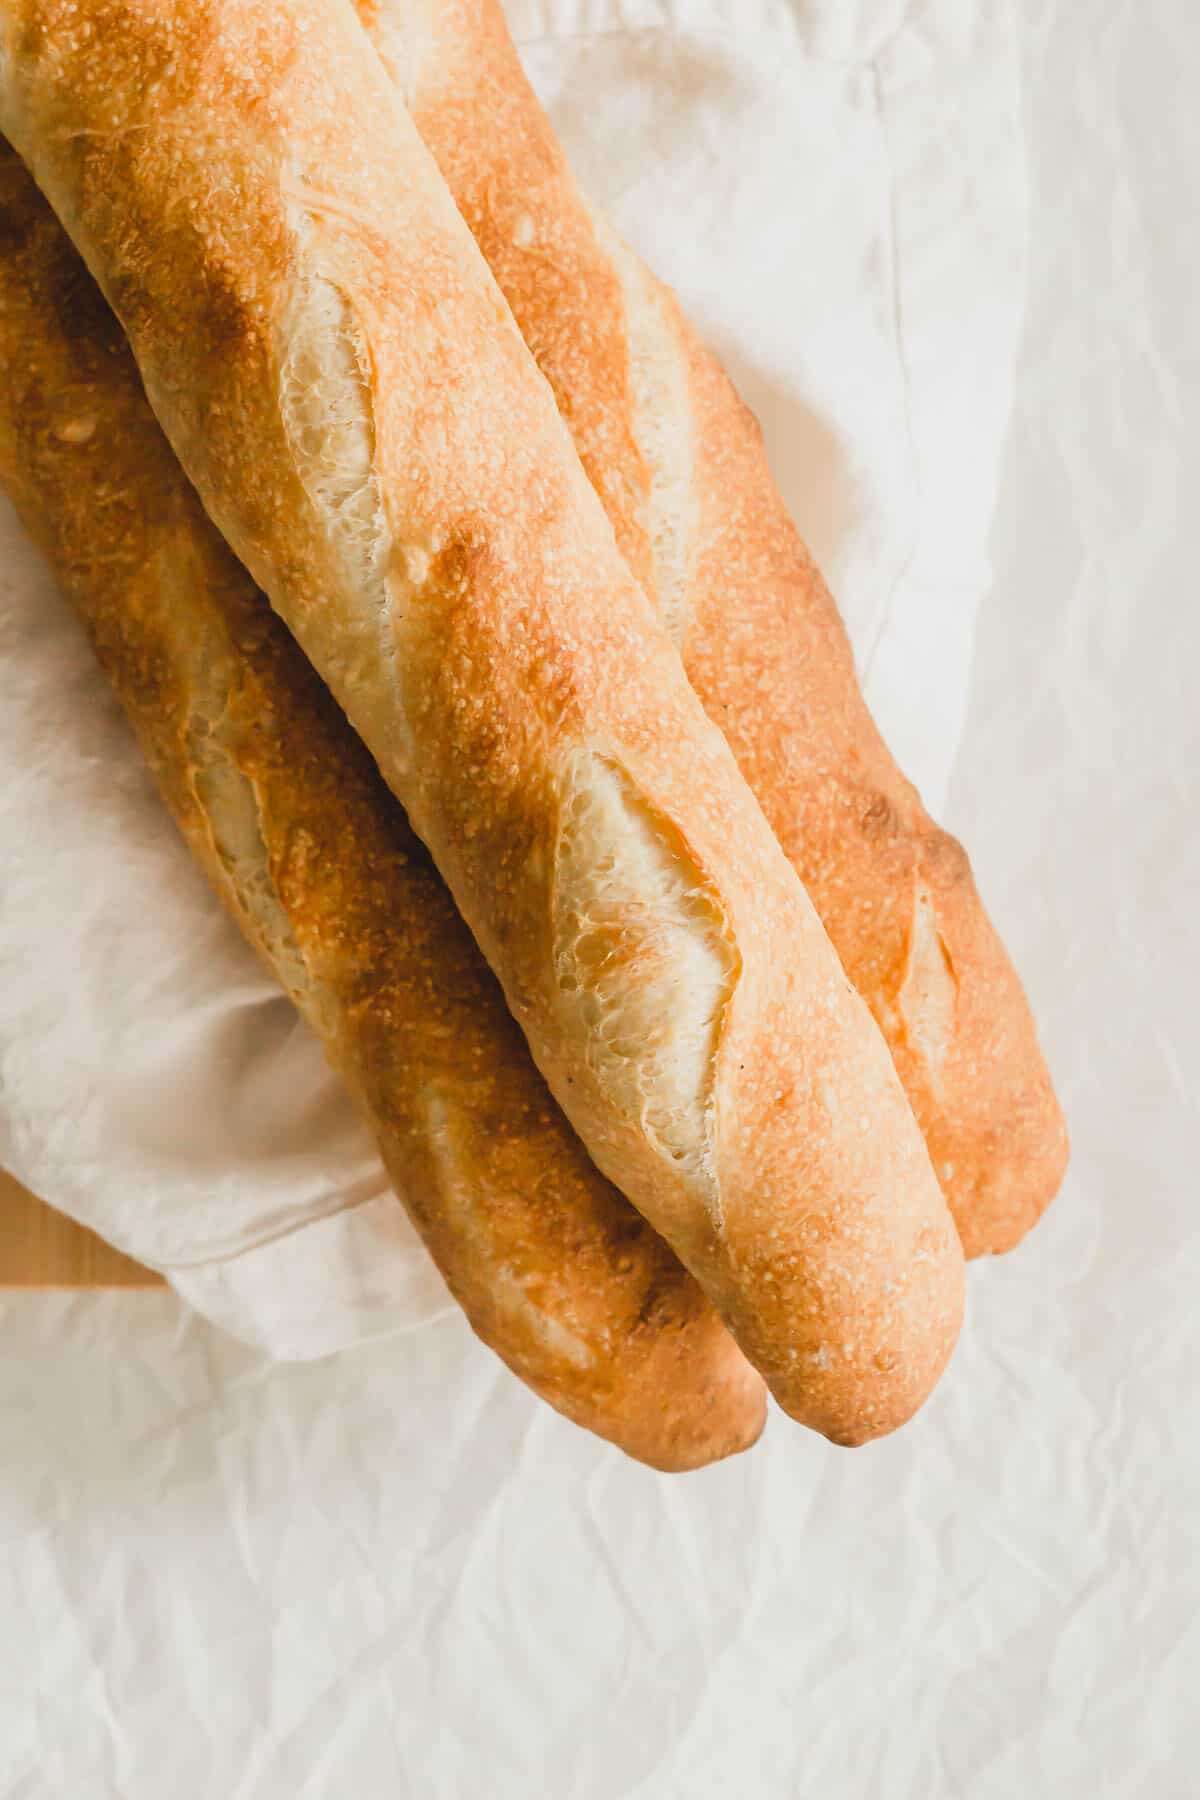
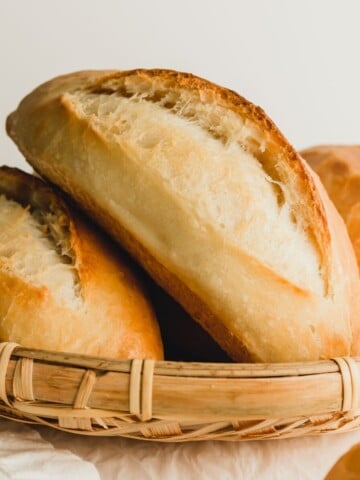
This recipe for Airy Baguette yields a crusty Italian-style ciabatta bread with open crumb. With a few stretches and folds and an overnight rise in the fridge you can enjoy artisan bread at home.
Want to save this recipe?
Enter your email & I'll send it to your inbox. Plus, get great new recipes from me every week!
Why you'll love this recipe
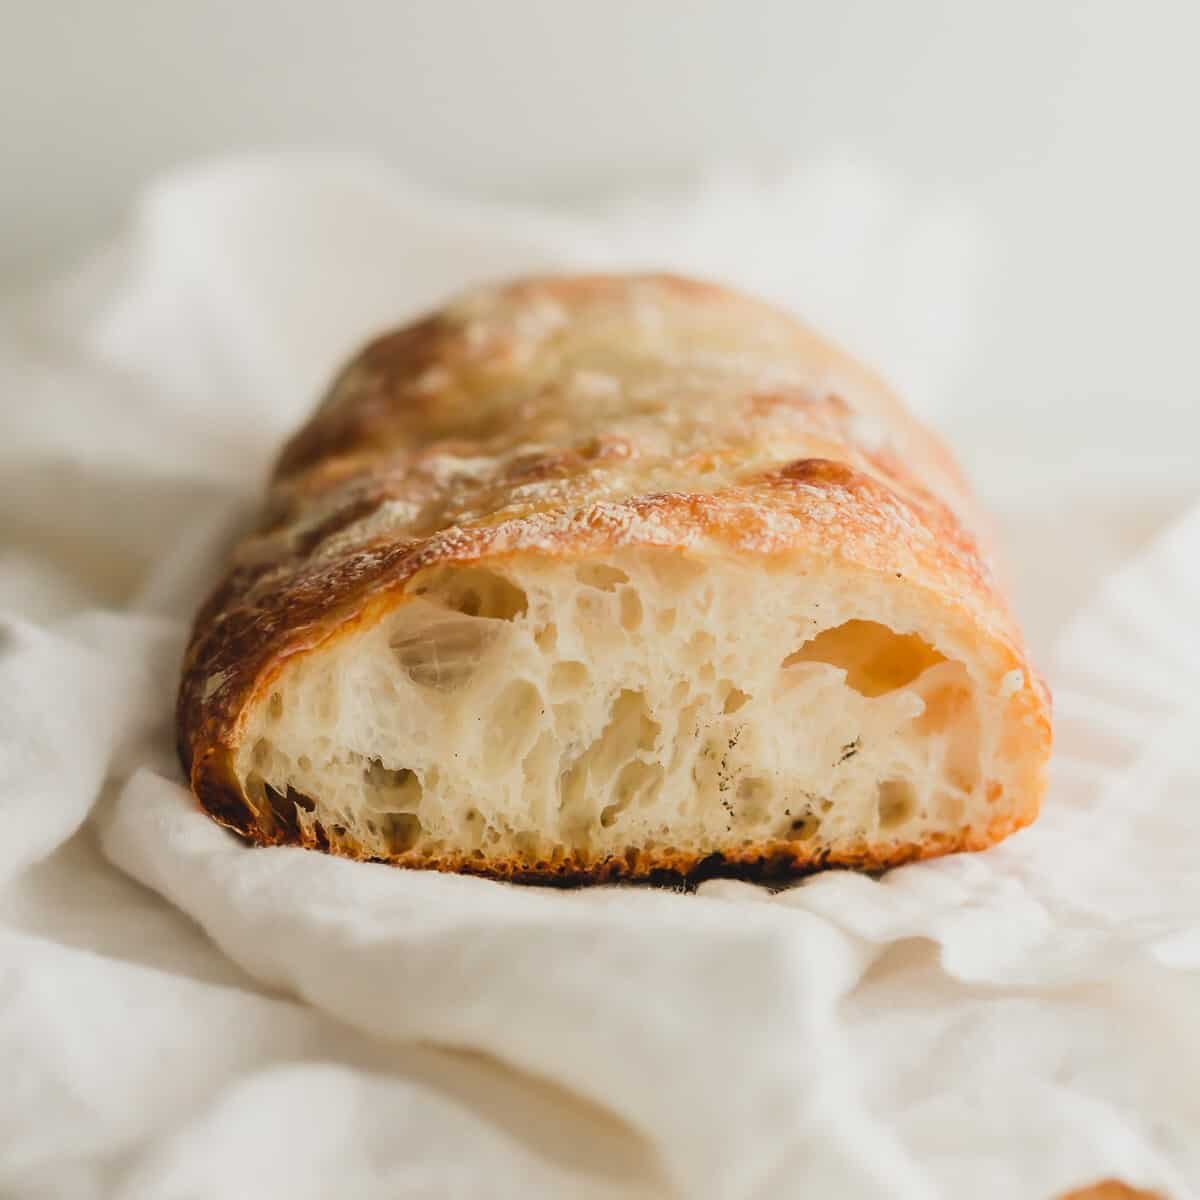
This recipe is based on an Italian-style ciabatta bread, in which the crumb contains large, airy holes.
Because this recipe high hydration (80%), there's no active kneading involved.
With a few stretches and folds and an overnight rise in the fridge, you can make bakery-style baguettes at home.
Cold fermentation, which is used in Sourdough Bread yields a more developed flavour and structure to the bread.
Equipment you'll need
- baguette pan: a perforated pan with wells for shaping and baking the baguettes, also used in my Homemade Banh Mi Baguette
- spray bottle: for spraying the baguettes with water to create steam
- dough scraper: for handling the dough
- sharp serrated knife or bread lame: for slashing the dough prior to baking
- very large bowl or container: for the dough, with room for expansion
I originally wrote this recipe before I purchased a baguette pan. Now that I have one, it definitely helps to have one on hand.
However, if you don't have one, you can still make the baguettes. See my tips below.
Ingredients you'll need
- bread flour: has a higher level of protein and gluten, and is preferred for making bread; you can still make it with all-purpose flour but do not use cake flour or self-raising flour
- water: filtered, at room temperature
- salt: use sea salt or kosher salt
- active dry yeast: or instant yeast
- olive oil: the distinguishing factor between French bread and ciabatta; use a high-quality olive oil for the best flavour
How to make the baguettes
You'll need to plan ahead to make these baguettes since it requires a bit of time to do the stretches and folds, as well as the overnight rise in the fridge.
Making the dough
On day 1:
In a very large bowl or container, combine the bread flour, water, yeast, and salt and give it a mix with a spatula until a dough comes together.
Cover the dough and let it rest for 5 minutes.
Add in the olive oil and mix it in to incorporate. Cover and rest for another 10 minutes.
Using a sturdy spatula, stretch and fold the dough (take the top of the dough and fold it over to the bottom [North to South], and the rotate the bowl 90 degrees and repeat, until it's been folded over 4 times). Cover and let it rest for another 10 minutes.
Repeat this stretch and fold process every 10 minutes for another 3 times.
In total, the dough should be stretched and folded 4 times.
Lightly grease the dough (and bowl), cover and place into the fridge for 1-3 days.
On the day you're ready to bake the bread:
Remove the dough from the fridge 2-3 hour prior to baking to let the dough come up to room temperature.
The dough should have lots of air bubbles in it now.
Lightly grease your work surface.
Tip the dough onto the work surface, being careful not to pop any air bubbles.
Use a dough scraper to divide the dough into 3 or 4 pieces, depending on how large you want the baguettes.
Shaping
If you don't have a baguette pan:
Carefully stretch and twist each piece of dough and place onto a parchment lined baking sheet.
Cover the baking sheet with a tea towel and let it rest for 1 hour in a warm location.
With baguette pan:
Gather each piece of dough and form into a round ball. Create surface tension by gently rolling it until it's smooth, letting it rest seam-side up.
Cover and let it rest for 15 minutes.
Flatten the dough into a oblong shape and fold the top half down to the bottom edge and seal.
Fold the bottom half up to the top edge and seal.
Now fold the dough again, taking the top half down to the center and seal.
Repeat with the bottom half, folding it up to the center, and gently roll to smooth out the baguette.
Place the shaped baguette onto a well of the baguette pan.
Cover with a tea towel and let it rest for about 1 hour, in a warm location.
Watch this video for shaping.
Baking
Preheat oven to 500F.
Place the baguettes into the oven and quickly spray them with water.
Close the door and bake for 10 minutes at 500F.
Reduce the oven to 450F and bake for another 12-15 minutes, until golden in colour.
Remove from oven and enjoy.
How to enjoy & store
If you're slicing the baguettes, it is important to let them cool completely.
You can enjoy the baguettes fresh and hot from the oven -- rip the baguettes and slather with some butter.
To reheat, pop the baguettes into a 350F oven with a few sprays of water, for about 5-7 minute, until warmed through.
Slice them into little rounds for appetizers or canapes: 3 Quick and Easy Holiday Appetizers.
Or use them for sandwiches.
Store unsliced baked baguettes in a paper bag at room temperature for up to 1 day.
As these baguettes do not contain any preservatives or dough enhancers, they are best enjoyed freshly made on the same day.
Expert tips & troubleshooting
As this baguette recipe is a high-hydration dough, it can be a little tricky to work with.
Using the stretch and fold method is an easier way to "knead" the dough.
For better flavour, let the dough rest in the fridge 2-3 days.
Creating lots of steam will ensure a crusty bread.
You can add a large roasting pan to the bottom of the oven with steaming hot water to create additional steam. Just be sure to remove the pan in the last 10 minutes of baking.
If your oven runs hot, add a piece of aluminum foil over the baguettes to prevent them from browning excessively.
Other bread recipes you may like
Be sure to check out these recipes:
Let me know if you try out this recipe -- tag me on Instagram @siftandsimmer or leave me a comment/rating below!

Airy Baguette
Equipment
- baguette pan
- spray bottle
- dough scraper
- very large bowl or container
For accuracy and precision in baking recipes, use weight (metric) measurements when available.
Ingredients
- 1 ¼ teaspoon active dry yeast or instant yeast
- 450 ml filtered water room temperature
- 5 g sea salt
- 567 g (20 oz) bread flour all-purpose flour
- 15 ml olive oil
Instructions
On day 1:
- In a very large bowl or container, combine the bread flour, water, yeast, and salt and give it a mix with a spatula until a dough comes together.
- Cover the dough and let it rest for 5 minutes.
- Add in the olive oil and mix it in to incorporate. Cover and rest for another 10 minutes.
- Using a sturdy spatula, stretch and fold the dough (take the top of the dough and fold it over to the bottom [North to South], and the rotate the bowl 90 degrees and repeat, until it's been folded over 4 times). Cover and let it rest for another 10 minutes.
- Repeat this stretch and fold process every 10 minutes for another 3 times. In total, the dough should be stretched and folded 4 times.
- Lightly grease the dough (and bowl), cover and place into the fridge for 1-3 days.
On the day you're ready to bake the bread:
- Remove the dough from the fridge 2-3 hour prior to baking to let the dough come up to room temperature. The dough should have lots of air bubbles in it now.
- Lightly grease your work surface.
- Tip the dough onto the work surface, being careful not to pop any air bubbles.
- Use a dough scraper to divide the dough into 3 or 4 pieces, depending on how large you want the baguettes.
If you don't have a baguette pan:
- Carefully stretch and twist each piece of dough and place onto a parchment lined baking sheet.
- Cover the baking sheet with a tea towel and let it rest for 1 hour in a warm location.
With baguette pan:
- Gather each piece of dough and form into a round ball. Create surface tension by gently rolling it until it's smooth, letting it rest seam-side up.
- Cover and let it rest for 15 minutes.
- Flatten the dough into a oblong shape and fold the top half down to the bottom edge and seal.
- Fold the bottom half up to the top edge and seal.Now fold the dough again, taking the top half down to the centre and seal.Repeat with the bottom half, folding it up to the centre, and gently roll to smooth out the baguette.
- Place the shaped baguette onto a well of the baguette pan.
- Cover with a tea towel and let it rest for about 1 hour, in a warm location.
- Preheat oven to 500°F/260°C.
- Place the baguettes into the oven and quickly spray them with water.
- Close the door and bake for 10 minutes at 500°F/260°C.
- Reduce the oven to 450°F/232°C and bake for another 12-15 minutes, until golden in colour. (If your oven runs hot, place a piece of aluminum foil over top to prevent the baguettes from turning too dark).
- Remove from oven and enjoy.
Nutrition
The nutritional information provided should be considered as approximate and is not guaranteed. Please use your best judgment to ensure food is safely prepared and/or a good fit for your diet.


Paul
Hi Michelle!
I made your Airy Baguette recipe couple of years ago. I just found it again and am currently trying it. I did the 4 stretch and folds with 10 min. between, and immediately put into the refrigerator. However, just 2 hours later, the dough is already doubled in size in the refrigerator. Can I still leave it for several days like that? I'm afraid it might over proof/over bulk raise and fall back. Appreciate your help and experience with this.
Michelle
Hi Paul!
Yes, you can leave the dough in the fridge. The cooler temperature of the refrigerator will retard the fermenting process, so you don't need to worry about over-proofing.
With regards to how many days, you can leave it in the fridge for 2-4 days, but in my experience, 48 hours is optimal. Hope that helps!
Katherine Richardson
Do I have to put it in the fridge? Can I just go straight from the golfing every 10 min to letting it sit at room temperature for a couple hours?
Michelle
You can leave it to sit at room temperature to proof like regular yeasted breads. Placing the dough into the fridge helps to develop its flavour.
John C Munna
Wondering why you have 378 gram or (20 oz flour)? 20-ounce flour equates to 567 grams flour.
This is a range of 378gr - 567gr or 3-4.5 cps.
John C Munna
My bad ... it was the use of the slide bar for servings
🙂
Carole from Canada
how do I adjust ingredients for just 3 baguettes. Also I want to use my 3 baguette pan. Any suggestions?
Michelle
Hi Carole, you can toggle the servings to reduce the amount -- however you can make the full amount of dough, divide it into 3 equal portions and use your 3-well baguette pan. For tips on how to make baguettes using a baguette pan, you can refer to my homemade banh mi baguette recipe: https://www.siftandsimmer.com/homemade-banh-mi-baguette/
Carole from Canada
Just another question. Recipe doesn't say to proof the active yeast in water first. Just says to put yeast flour etc. in mixer bowl. Usually one would proof active yeast in water. Any reason this recipe is different?
Also, thank you for replying to my first questions.
Michelle
Hi Carole, there's no need to proof the yeast since it will be undergoing a cold ferment. I've also updated the recipe with additional tips.
Carole from Canada
Thanks again for an answer and I have also read the updated recipe with great additional tips.
Thank you so much.
Carole
forrest
Oh my goodness this is yummy! Thank you for the recipe.
I was worried it wouldn't work because the yeast wasn't proofed. Well, I 'm glad I went ahead and followed exactly what the recipe said. The dough was in the refrigerator for 2days and I baked on the 3rd. I made 3 baguettes so they would be a good size for sandwiches. Also I used a baguette /french loaf perforated pan. I'll be baking these regularly!
Forrest
Michelle
Glad it worked out for you! Thanks for your feedback and for trying the recipe, Forrest 🙂
Linsey
Hi Michelle, I just finished baking the baguette. It turns out very beautiful! I used half of your dough recipe and made a large piece with the baguette pan. My oven was set at 500F for 12 minutes, and then reduce to 475F for another 10 more minutes. Delighted that the bread is crusty on the outside and very soft and fluffy on the inside! Thanks!
Danie
I know you recommended to enjoy day of, but do these hold up well to being frozen?
Michelle
Hi Danie, I haven't actually tried freezing the baked baguette so I can't say definitively -- you could try par-baking the baguette and freezing it for later (in an airtight freezer bag), for up to 1 month? If you do try that, let me know how it turns out.
Carmen
Please tell me,, is it 20 ounces or 567 grams ( around 4 cups)
I keep wanting to make this baguette and I am so confused
thanks
Michelle
Hi Carmen, 20 oz of bread flour is equal to 567g.
Carmen
Thanks, I was using fluid ounces on my weight scale. My mistake. I did your baguette before without worrying about scale/weight and it turned out the best tasting of all my other efforts. I'm doing yours again. It had taste, not bland.