
My Mom's Pepperoni Buns contain spicy pepperoni sticks coiled with a soft and fluffy yeasted dough. It's impossible to eat just one. Find out why they're my favourite childhood snack.

Want to save this recipe?
Enter your email & I'll send it to your inbox. Plus, get great new recipes from me every week!
As a child growing up, one of my most fondest memories is of my Mom making me and my brother these Pepperoni Buns.
What is pepperoni?
Pepperoni is a cured and dried pork and beef meat product, usually flavoured with spices such as paprika and chili pepper.
The word pepperoni comes from the Italian word "peperone," which means bell pepper.
It may come in large sausage "tubes" which are sliced for pizza, or they may be sold as long sticks.
Pepperoni sticks may come intertwined so you'll need to cut them into individual sticks.
What are pepperoni buns?
These pepperoni buns are a spin on the Chinese bakery-style hotdog bun.
Hot dog buns are typically made with hot dogs and wrapped with a yeasted bun dough.
As you can imagine, these are made with pepperoni sticks instead of hotdogs.
Why this recipe works
Because pepperoni sticks are dry cured, they are shelf-stable and can last a long time.
This also means that these pepperoni buns can last a room temperature longer than a hotdog bun, which would need to be refrigerated right away.

Ingredients you'll need
For the buns, you'll need:
- whole milk: warmed, you can use any milk or non-dairy alternative you like
- granulated sugar: balances out the saltiness from the pepperoni and helps activate the yeast
- active dry yeast: acts as the leavener for the buns
- all-purpose flour: you can use all-purpose flour, or if you bread flour on hand, you can use that as well
- egg: large egg, beaten
- avocado oil: or any neutral vegetable oil, adds moisture to the buns
- pepperoni sticks: I used 5 long pepperoni sticks, and cut them in half for a total of 10 sticks
How to make the buns
Combine warmed milk, sugar and yeast in a bowl. Give it a stir and let the yeast activate.
In a stand mixer fitted with a dough hook attachment, add the flour, egg, oil, sea salt, and yeast mixture.
Start the mixer and knead the dough until smooth and elastic.
Transfer the dough to a lightly oiled bowl. Cover with a tea towel or plastic wrap and let it rise until doubled in size.
In the meantime, cut the pepperoni sticks in half on a bias (at an angle).
Once the dough has risen, divide the dough into 10 equal pieces.
Roll each piece into a long rope, about 8-10" in length.
Taking a pepperoni stick, coil the dough around the pepperoni at an angle, working from one end and tucking it in the other end.
Place the bun on a parchment-lined baking sheet and repeat with the rest.
Cover the buns and let rise until slightly puffy, about 20 minutes, depending on how warm your kitchen is.
Preheat oven to 375F.
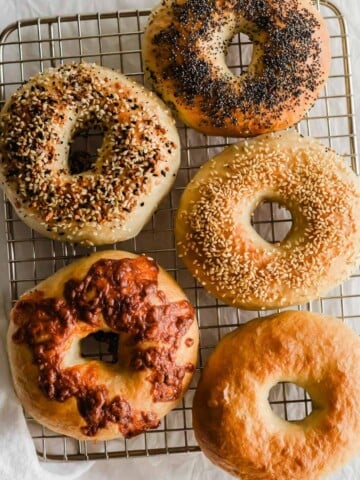
Lightly brush the tops of the buns with beaten egg (egg wash). Sprinkle with sesame seeds if you wish.
Bake the buns for 18-20 minutes, until lightly golden in colour.
Variations & substitutions
For mini pepperoni buns, snip each pepperoni stick into 3rds and divide the dough into 15 pieces.
Change up the toppings: try adding black or white sesame seeds, za'atar seasoning, or Parmesan cheese (my kids' favourite)!
Add a sugar glaze to the buns to give it a sweet and glistening sheen.
Use hot dogs instead of pepperoni.
Add cheese to the pepperoni sticks, similar to how I did here: Turkey Pepperoni Cheese-Stuffed Breadsticks.
If using hot dogs, you can even cut the hotdog-wrapped dough and play around with the shapes.

FAQs
Why didn't my buns rise?
Check your yeast. If the yeast is not active, then the buns won't rise.
How do I know the buns are ready after proofing?
Use the poke test:
If you poke the dough after rising, it should leave an indent and spring back a little.
When you poke the dough and it springs back right away, it needs more proofing time.
Why didn't you add any salt to the dough?
The pepperoni itself is quite savoury. Adding sugar to the dough helps give it a bit of balance so it neutralizes the saltiness of the pepperoni.
Do I need to remove the pepperoni casing?
No. The pepperoni casing on pepperoni sticks is edible.

How to store and reheat the buns
These buns can be stored in an airtight container at room temperature for up to 3 days.
You can also pop them into a freezer-safe container and freeze for up to 6 months.
Reheat the buns by microwaving them for 40-60 seconds, until piping hot.
This is one of my favourite everyday doughs to work with since it comes together quickly and yields a nice, soft bun.
Great for picnics, road trips, or anytime
These pepperoni buns are easy to eat while you're on-the-go.
They make an appearance in my kids' lunchboxes every so often.
And since they can last at room temperature for a while without having to worry about finding a refrigerator, they are convenient for road trips or picnics too.
Savoury, spicy pepperoni wrapped in a soft and delicious dough -- try it and you'll understand why it's my childhood favourite!
Other recipes you may like
Be sure to check out these other recipes:
Turkey Pepperoni Cheese-Stuffed Breadsticks
Braided Pork Floss Green Onion Buns
Be sure to let me know if you make these soft and delicious Pepperoni Buns! Tag me on Instagram @siftandsimmer or leave me a comment/rating below -- I'd love to see your creations!


Mom's Pepperoni Buns
For accuracy and precision in baking recipes, use weight (metric) measurements when available.
Ingredients
- 240 ml whole milk lukewarm
- 30 g granulated cane sugar
- 7 g active dry yeast
- 500 g all-purpose flour
- 1 large egg + extra for eggwash
- 60 ml avocado oil or vegetable oil
- 5 pepperoni sticks cut into half (for regular) or into 3rds (for mini)
Glaze (optional)
- 15 g granulated cane sugar
- 15 g hot water
Instructions
- Pour the warmed milk into a bowl, add in the sugar and yeast. Give it a stir and let the yeast activate and bubble.
- In a bowl of a stand mixer fitted with a dough hook, add in the flour, egg, oil and sea salt. Start the mixer of low and pour in the activated yeast and milk.
- Knead until the dough starts to come together and forms a smooth and elastic ball, about 7-8 minute of kneading.
- Put the dough into a lightly greased bowl and cover with plastic wrap. Place in a warm location and let the dough double in size (approximately 90 mins, depending on how warm your kitchen is).
- Prepare a baking sheet with parchment paper. Set aside.
- Once the dough has risen, deflate the dough and divide in 10 equal portions (if making regular sized buns) or 15 portions (if making mini sized).
- Roll each portion of dough into a long cylinder.
- Take one stick of pepperoni and begin to coil the dough at an angle around the pepperoni. Tuck in the ends.
- Place onto a baking sheet. Repeat with the remainder.
- Preheat the oven to 350°F/177°C.
- Loosely cover the buns and let rise for another 20 minutes, or until slightly puffy.
- In a small bowl, lightly beat an egg. Use a pastry brush to gently brush the tops of the buns. Add sesame seeds or any toppings you desire.
- Bake at 350°F/177°C for 18-20 minutes, until lightly golden. If the tops are browning too quickly, place a piece of aluminum foil over top.
- Glaze (optional): In a small bowl, dissolve 1 tablespoon granulated sugar with 1 tablespoon hot water and use a clean pastry brush to brush the tops of the baked buns. Return the buns into the oven (with the heat turned off) for another 2 minutes.
- Remove buns and let cool on a cooling rack.
- Best served freshly made. Or keep in an airtight container at cool room temperature for up to 3 days.
Notes
Nutrition
The nutritional information provided should be considered as approximate and is not guaranteed. Please use your best judgment to ensure food is safely prepared and/or a good fit for your diet.


Christie
Awww I love reading that food memory between you and your mom! These bring back a lot of childhood nostalgia for me too! I love these buns!
Michelle
Yes, these buns hold lots of wonderful memories of my childhood! Thanks Christie! 🙂
Norah
so fluffy and easy to make everybody loved them ♥️♥️
Michelle
Amazing, glad to hear it Norah! 🙂
Linsey
Excellent sausage buns, very soft and delicious!
Biana
These buns look amazing! Perfect for hot dogs and pepperoni.
Jessie
I love this idea! These will be great for trips this summer!! Keeping this recipe handy
Beth
Such a big hit and so yummy! My teens told me they are addicting, so I tried one and oh my goodness they definitely are! Will be making these again!
Michelle
Ohhh that is amazing to hear, Beth! Glad your kids loved them! 🙂
Jeannette
I love the original Chinese version, but using pepperoni is such a great idea! The bun's sweet flavour goes so well with the peppery sausage!
Michelle
Yes, the original version is great -- I love it too! Thanks Jeannette! 🙂
Dannii
I never would have thought to use pepperoni like this. Such a great idea.