
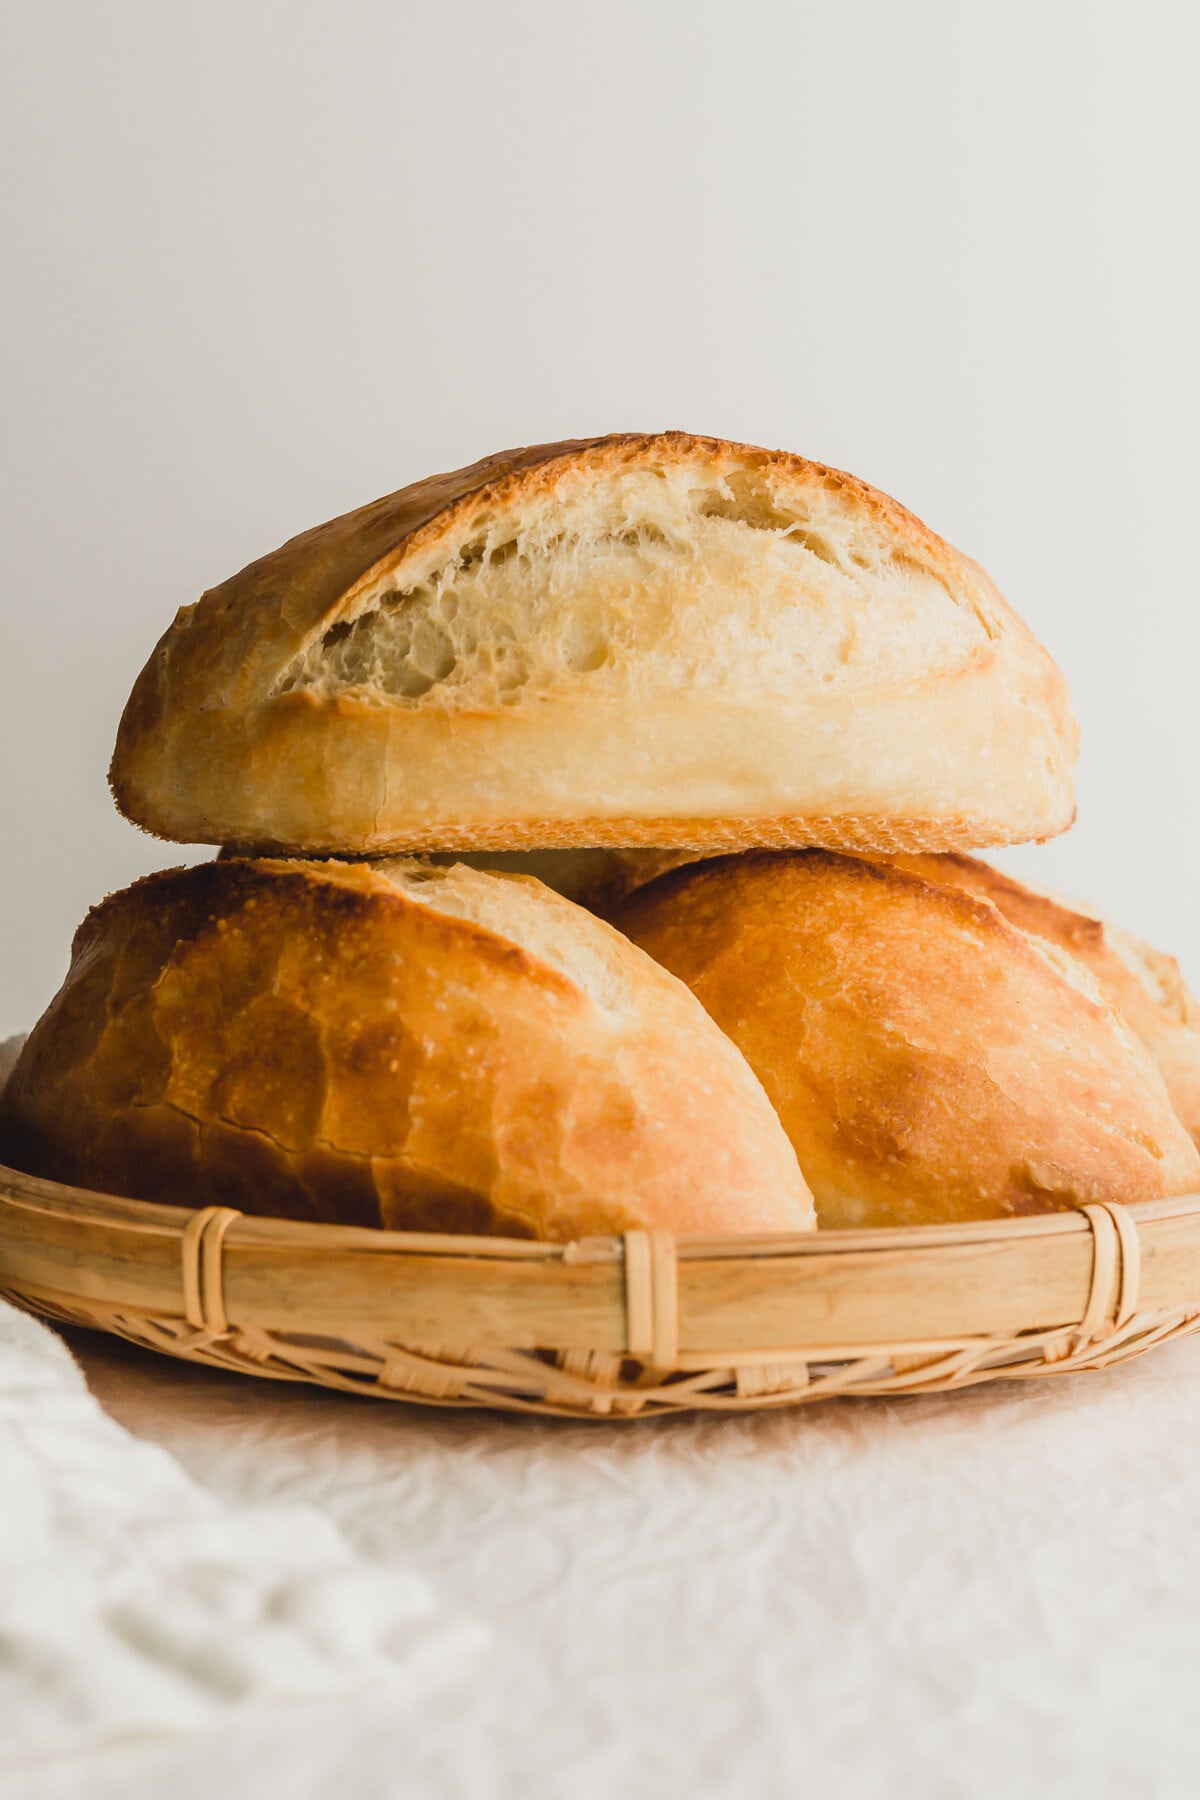
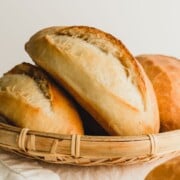
This Vietnamese Bánh Mì Baguette is soft and fluffy inside with a crisp, crackly crust. It's the perfect base for Vietnamese bánh mì sandwiches. Made with a few simple ingredients, this recipe brings Vietnamese-style baguettes right into your home kitchen.
This recipe first appeared on Sift & Simmer in Dec 2020. Updated October 2025.

Want to save this recipe?
Enter your email & I'll send it to your inbox. Plus, get great new recipes from me every week!
What is banh mi?
In Vietnamese, "bánh mì" simply means "bread."
However, it's also the name of the beloved Vietnamese sandwich made with a light, airy baguette that's crisp on the exterior and soft within.
The sandwich is often filled with pickled vegetables, cold cuts (such as cha lua), pâté, and fresh herbs.
History of bánh mì
Bánh mì has its roots in French colonial Vietnam. French baguettes were introduced in the 1800s and were originally enjoyed with butter, sugar, or pâté.
By the 1950s, Saigon street vendors had reimagined the French baguette, creating the modern bánh mì Sài Gòn -- lighter, airier, and perfectly suited to local flavors.
Today, it's an iconic Vietnamese street food enjoyed worldwide.
What's the difference between bánh mì vs. French baguette?
While they may look similar, bánh mì baguettes differ from French baguettes in texture and structure:
Bánh mì baguettes are lighter, airier, and crispier.
French baguettes tend to be denser and chewier with a thicker crust.
Why you'll love this recipe
It's light, airy, and crisp just like Vietnamese bakery baguettes.
Made with simple ingredients, no bread improver or Vitamin C (ascorbic acid) and clear, foolproof steps.
Perfect for pairing with your favorite bánh mì sandwiches or stews.
Ingredients you'll need
- bread flour: has a higher protein content which produces gluten strands, which is needed for a soft and elastic dough. If you don't have bread flour, you can use all-purpose flour, but be sure to knead the dough for the recommended time to reach windowpane stage.
- active dry yeast: activate the yeast in lukewarm water, unless using instant yeast
- water: lukewarm water helps to activate the yeast
- sea salt: enhances flavor
- whole egg: adds richness and yields a tender crumb
- granulated sugar: feeds the yeast and helps crust brown
- vegetable oil: helps with browning and adds moisture
Notes
On rice flour:
Some recipes call for rice flour to create a lighter texture, but in my testing, it made the baguettes dense and tough. I recommend sticking with wheat flour for the best result.
On adding egg:
Traditionally, bánh mì dough is made with just flour, yeast, water, and salt.
On testing, I found that adding one egg gives the interior crumb a softer, more delicate texture, similar to a light brioche.

Special equipment
- baguette pan: perforated to hold shape and promote even baking; I recommend metal and not silicone
- dough scraper: for easy portioning and shaping; metal or silicone
- clean water spray bottle: to create steam in the oven for crusty exterior
- sharp serrated knife or bread lame: for scoring clean slashes before baking
How to make Vietnamese-style bánh mì bread
Make the dough
In a measuring cup, combine warm water, sugar, and yeast. Give it a stir and let it sit until foamy.
Add all ingredients to a stand mixer fitted with a dough hook.
Knead on medium speed for 10-12 minutes, until smooth and elastic. The dough should stretch thinly without tearing (windowpane stage* see expert tips below).
Transfer to a lightly oiled bowl, cover, and let rise until doubled in size (about 1 hour in a warm spot).

Shape the dough
Once risen, divide the dough into 6 equal triangular portions (Step 1 above).
Slap the dough to release any air bubbles and shape into a triangle.
Start from the "pointy" end of the triangle and roll and pinch the sides, while working your way down (Step 2).
Seal the ends and place onto a perforated baguette pan (Step 3).
Repeat with the remainder.
Cover lightly with a damp cloth and leave to rise in a warm location, until puffy and almost doubled in size, about 30-45 minutes.
Preparing the oven
Towards the end of the proofing time, preheat oven to 425F.
Place a roasting pan filled with hot water on the bottom rack to create steam.
Baking the baguettes
Spray the baguettes with water.
Make a swift yet controlled slash at a 45 degree angle on each baguette with a sharp knife or baking lame (Step 4).
Spray the tops of the baguettes with water again.
Place the baguettes into the oven and quickly spray the baguettes with water (to create steam) before shutting the oven door.
Bake for a total of 22 minutes. Every 2 minutes, open the oven door and spray the baguettes with water, until 6 minutes have elapsed (do this 3 times, every 2 minutes).
When there is 10 minutes left in the baking time, carefully remove the roasting pan with hot water and let the baguettes continue to bake.
Cool the baguettes completely on a wire rack before slicing.

Watch how to make bánh mì baguettes
How to serve
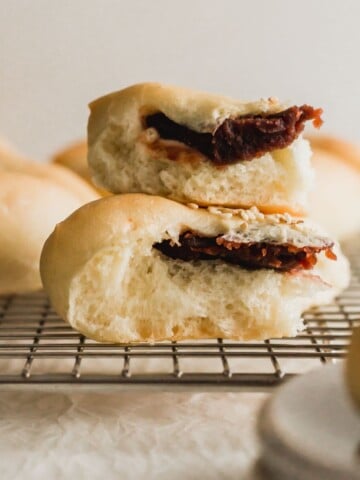
Enjoy freshly baked bánh mì baguettes as the base for a classic Cold Cut Bánh Mì, with Vietnamese Beef Stew (Bò Kho), or simply with butter and condensed milk for a nostalgic treat.
Slice up the baguettes and use it in a Banh Mi Charcuterie Board. Pair with iced Vietnamese coffee,
The Vietnamese-style bread is best enjoyed on the same day it's baked.
How to store and reheat
Room temperature: store in a paper bag for up to 1 day.
Fridge: keep in an airtight bag for up to 1 week.
Freezer: freeze in an airtight freezer bag for up to 1 month.
To reheat: warm in a 350°F (175°C) oven for 10-12 minutes to restore crispness.
Expert tips
Don't skip the steam! A combination of misting and a tray of hot water in the oven is key to achieving that crisp, crackly crust.
No baguette pan? Shape the dough onto a rice flour covered-towel, and create a "couche" /well for each baguette for proofing. You'll need to be careful when you transfer the shaped baguettes to the baking sheet for baking.
Windowpane stage: to test if your dough is ready, take a small piece and gently stretch it between your fingers. If it forms a thin, translucent "window" without tearing, your gluten is well-developed and the dough is ready for bulk fermentation.
Slashing the tops of the loaves helps to prevent the bread from exploding or being mis-shapened.
Every oven bakes differently: adjust the rack position or baking time slightly if needed.
Don't skip the rest periods: they help the dough relax for smooth shaping and even baking.
Other delicious Vietnamese recipes you may like


Did you make this recipe?
Let me know if you try out this recipe -- I love seeing your creations! Tag me on Instagram @siftandsimmer and be sure to leave me a comment/rating below!
Vietnamese Bánh Mì Baguette
Equipment
- baguette pan
- spray bottle
- dough scraper
- sharp knife/bread lame
For accuracy and precision in baking recipes, use weight (metric) measurements when available.
Ingredients
- 270 ml warm water
- 2 g granulated sugar
- 7 g active dry yeast
- 500 g bread flour or all-purpose flour
- 5 g sea salt
- 30 ml vegetable oil
- 1 large egg
Instructions
Make the dough:
- Measure out the warm water into a large measuring cup.
- Stir in the sugar and yeast. Give it a mix to activate the yeast.
- Add the flour, salt, oil, and egg into a stand mixer bowl fitted with a dough hook.
- Once the yeast is bubbly, pour it into the flour mixture.
- Knead the dough until it is smooth and elastic, at least 10 minutes on a stand mixer at medium speed (depending on your mixer's horsepower).
- The dough is ready when you can stretch a little bit of the dough between your fingers and it creates a thin "windowpane."
- Transfer the dough to a lightly oiled bowl and cover.
- Let it rest in a warm location, until doubled in size.
Shape the dough:
- Once risen, divide the dough into 6 equal triangular portions.
- Slap the dough to release any air bubbles and shape into a triangle.
- Start from the "pointy" end of the triangle and roll and pinch the sides, while working your way down.
- Seal the ends and place onto a perforated baguette pan. (I placed 2 pieces of dough on each "well").
- Repeat with the remainder.
- Cover lightly with a damp cloth and leave to rise in a warm location, until puffy and almost doubled in size.
Preparing the oven:
- Towards the end of the proofing time, preheat oven to 425°F/218°C.
- Adjust the oven rack to the 3rd from the bottom.
- Carefully add a large roasting pan filled with hot boiling water to the bottom rack of the oven.
Baking the baguettes:
- Spray the baguettes with water using a clean kitchen spray bottle.
- Make a swift yet controlled slash at a 45° angle on each baguette with a sharp knife or baking lame.
- Spray the tops of the baguettes with water again.
- Place the baguettes into the oven and quickly spray the baguettes with water (to create steam) before shutting the oven door.
- Bake for a total of 22 minutes. Every 2 minutes, open the oven door and spray the baguettes with water, until 6 minutes have elapsed (do this 3 times, every 2 minutes).
- When there is 10 minutes left in the baking time, carefully remove the roasting pan with hot water and let the baguettes continue to bake.
- Cool the baguettes completely on a wire rack before slicing.
Notes
Nutrition
The nutritional information provided should be considered as approximate and is not guaranteed. Please use your best judgment to ensure food is safely prepared and/or a good fit for your diet.
Recipe adapted from Aimee's Cooking.


Susan
The video is great and the directions are spot on. Thank you Michelle!
Cindy
Nice clear instructions. I am in a warm/humid environment and i proofed 35 minutes then 30 minutes after shaping. I did not have a clean spray bottle so I just spritzed with my hands and the start of the bake and did the steam pan in the oven. Had to DIY a baguette pan by rolling/folding 2 silpats to hold the baguettes which actually worked decently well! I would be curious to come prepared with a spray bottle next time to see if that would improve the crust with repeated sprays. Next time I would divide my dough evenly with scale as some baguettes ended up being a big smaller and then overbaked compared to the larger ones. I would maybe also add a tiny bit more salt to help with flavor.
Michelle
Hi Cindy, a spray bottle will definitely help the crust develop and a digital scale helps with portioning the dough. Try it for next time 🙂
Celine
so good!! would recommend
Michelle
Thanks for your feedback, Celine!
Erica
Is the kneading time (10 min) still the same if your kneading by hand? I don't have a stand mixer yet.
Michelle
Hi Erica -- for best results, this recipe is really dependent on the kneading power of the stand mixer. Without kneading the dough for a sufficient enough time, the gluten strands will not be developed enough to yield that light, fluffy crumb. You could knead by hand, but it would take at least 20 or 30 minutes of consistent kneading -- super tiring... good luck!
Mello
This recipe looks amazing. I also love your tangzhong sweet bread recipes! Could I do an overnight proof for the first rise? Then after that continue with the process, shape, and second rise, etc? Thanks!
Michelle
Hi Mello, sure, I don't see why you can't do an overnight proof -- it would probably give the bread even more flavor. Do report back if you try it that way 🙂
Suzie
I followed the recipe and it turned out beautiful. Only change was I shortened the time a little bit because as my oven runs hot I believe. Soft and spongy on the inside and crunchy on the outside. Holds up beautifully when making the banh mi. I also did pickled veggies with it. Thank you for the outstanding recipe and the video was very helpful.
Michelle
Hi Suzie, absolutely -- if your oven runs hot, do shorten the baking time. Thank you for taking the time to leave your feedback! Happy to hear the recipe and video were helpful to you 🙂
Amanda
I made this recipe earlier today, along with a different but similar recipe for comparison, and this recipe was the clear winner. They turned out perfect! Light crispy crust, and soft interior - perfect Banh Mi buns! I’ll definitely be making these again.
Michelle
Hi Amanda, thanks so much for taking the time to leave me a comment. I am delighted to hear that the baguettes turned out well for you! 🙂
Chloe
Yes! The best recipe so far for banh my. Successful in the first try.
Michelle
Hi Chloe, thanks for your comment! Happy to hear that it worked out on the first attempt 🙂
Rashid
This is my first time I leave a comment on a blog. I've made this today and it was soooo good (along with lemongrass chicken from your blog which was also very good - both were perfect combo). The bread was soft. The video instruction was very very useful. Thank you so much!!
Michelle
Hi Rashid, thank you so much for taking the time to leave a comment. Happy to hear the recipes turned out well for you and that the video was helpful 🙂
Miles
Used this great recipe many times and always came out great.
In case anyone is wondering, I used the recipe in my Dutch oven to make a whole bread loaf and it turned out amazing.
Score like any loaf and spritz before you close the lid. 450 for 40 minutes.
Michelle
Hi Miles, thanks very much for taking the time to leave a comment with your detailed feedback! 🙂
Shawn
When you form the dough triangle, how many inches across is the horizontal bottom part (like 5")? And how many inches is the long vertical part (like 8')?
Michelle
Hi Shawn, the dough triangle should be about 6" across the horizontal and about 8" on the vertical, although it doesn't really matter too much (about the vertical) as long as you're stretching it out to coil it back up, while tucking in the sides. Hope that helps.
Judy Chan
How long does it take to double in size for the dough?
Michelle
Hi Judy, it really depends on the temperature and humidity of your kitchen. If it's warm, it can double as quickly as 45 minutes, but typically, it can take anywhere from 1-2 hours, with an average of 1.5 hours. The best way to check is to gently poke the dough and see if it springs back slowly... then it's ready. Hope that helps.
Tasia
We loved these baguettes for our banh mi sandwiches! The soft interior with a crunchy outside was perfect. Thanks for another winner Michelle!
David @ Spiced
Oh this sounds like the perfect baguette recipe with its crispy crust and soft crumb! Now I'm craving homemade bread. Thanks for sharing!!
Michelle
Thanks David, it's such a delicious soft yet crusty baguette! 🙂