
This 2-layer Taro Coconut Cake is a light and fluffy spongy coconut chiffon cake layered with a smooth homemade taro paste and whipped coconut cream filling.

Want to save this recipe?
Enter your email & I'll send it to your inbox. Plus, get great new recipes from me every week!
Why you'll love this recipe
This tender chiffon-style cake is based on my Perfect Swiss Roll Cake recipe.
It is inspired by a bakery-style cake from T&T Supermarket.
Homemade Taro Paste gives this Taro Coconut Cake a rich, creamy texture and is not too sweet.
There is no need for chemical leaveners such as baking powder since the cake is leavened by whipped egg whites.
Unlike buttercream-based cakes, this whipped cream-style cake does not need to sit at room temperature prior to serving.
There's only a few ingredients you'll need.
What is taro?
Taro is a starchy root vegetable that is used in many cuisines.
It can be used in sweet or savoury applications, such as in bubble tea, or Chinese braised pork with taro.
It has a tough, brown exterior with an interior that is white/beige in colour with purple flecks.
Taro has similarities to starchy root vegetables like sweet potato/yam/ube, and has a slightly sweet and nutty taste.
For this recipe, homemade taro paste is blended into a robust, smooth and silky filling.

Note on purple taro colour
Taro has a naturally pink-ish/beige colour, but is commonly depicted as lilac purple.
For this cake, I added a little purple sweet potato powder to colour the taro paste naturally. This is optional.
Recipes using taro
Taro & Pitaya Mochi Croissants

Ingredients you'll need
For the cake:
- egg whites: best at room temperature, which will whip up with more volume than cold from the fridge
- granulated sugar: adds sweetness to the cake and stability to the egg white meringue
- cream of tartar: is an acid that helps stabilize the whipped egg whites; you can also use lemon juice or white vinegar as a substitute
- egg yolks
- coconut milk: use full-fat coconut milk, or whole milk
- coconut extract: optional, but accentuates the coconut flavour in the cake; you can also use vanilla extract if you like
- vegetable oil: you can use any neutral vegetable oil, such as avocado oil
- cake flour: contains less protein than all-purpose or bread flour and yields a light texture; do not use bread flour for this cake
Taro filling:
- taro paste: blended into a smooth paste
- purple sweet potato powder: for colouring, optional
Coconut whipped cream:
- heavy whipping cream: at least 36% MF (milkfat), chilled; you can use a coconut cream (full fat) if you like
- coconut extract: use a pure coconut extract for the best flavour
- powdered sugar: adds a little sweetness to the cream
Taro whipped cream frosting:
- heavy whipping cream: at least 36% MF (milkfat), chilled
- taro paste
- purple sweet potato powder: for colouring, optional

How to make it
This recipe is adapted from my Perfect Swiss Roll Cake.
Preheat oven to 325F.
Line two 6" round pans with parchment paper. Set aside.
Make the cake batter
In a bowl, whisk together egg yolks with sugar, oil, coconut milk/whole milk, coconut extract.
Sift in the cake flour over top of the egg yolk mixture and fold gently to combine, until there are no lumps.

In a clean stand mixer bowl fitted with a whisk attachment, add in the egg whites and mix on low speed.
Once the egg whites are slightly foamy with bubbles, add in a little cream of tartar (or lemon juice/vinegar).
Gradually increase the speed of the mixer, and slowly pour in the granulated sugar.
Continue to whip the egg whites until fluffy, shiny and reaches a soft peak. (The egg whites will form a curved tail at the end of the whisk).
Fold about a third of the egg whites into the egg yolk batter.
This will help to loosen up the egg yolk batter.
Add the next 3rd of the egg white mixture, folding it into the egg yolk mixture.
Continue to fold until all of the remaining egg white mixture is incorporated into the batter, taking care not to overfold.


Divide and transfer the cake batter into two 6" round pans (use a scale to evenly distribute).
Gently tap the pans a few times to release any trapped air bubbles.
Bake the cake
Bake at 325F for 25-30 minutes, or until a toothpick inserted comes out clean.
Remove the cakes from the oven and carefully drop them on the counter from a height of about 1' (to prevent too much shrinkage).
Cool the cakes in the pan for about 2 minutes before transferring to a wire rack to cool completely.
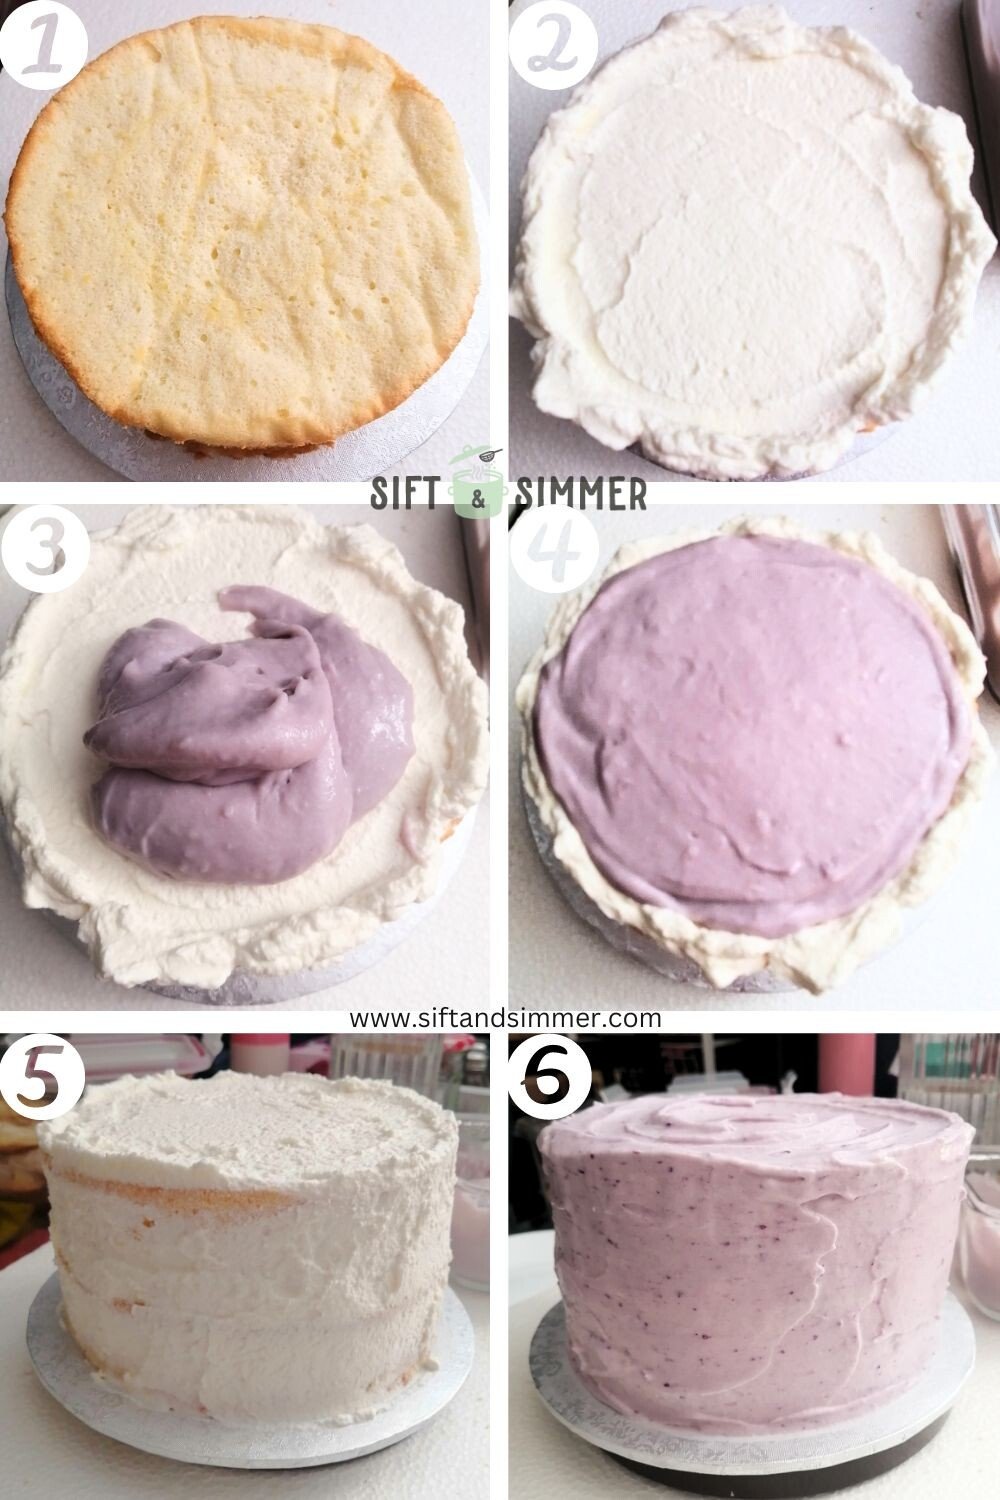
Decorate the cake
Place one cake round onto a cake board.
Pipe coconut whipped cream around the circumference of the cake.
Add the taro paste to the centre and smooth with an offset spatula.
Place the second cake round on top.
Cover the entire cake with taro whipped cream and pipe decorations on top.
Chill in the fridge until ready to serve.

How to store & serve
Store the cake in the fridge until ready to serve.
Freeze cake slices well wrapped in a freezer-safe container for up to 3 months.
Defrost the cake in the fridge overnight, or bring to room temperature for 30 minutes prior to serving.
Expert tips & troubleshooting
On making the egg white meringue:
For the eggs, it's best to separate them while cold from the fridge and then let the egg whites and yolks sit at room temperature before proceeding with the recipe.
This will help the meringue mixture whip up with more volume.
Adding the sugar gradually in increments, builds a stable meringue structure.
Adding a little cream of tartar or lemon juice also helps to stabilize the meringue, so it doesn't deflate as quickly.
My cake souffléd and overrose during the baking process.
The cake will deflate as it cools. If it has cracked, you can trim down the layer.
For next time, be careful not to overwhip the egg whites. Be sure to whip the egg white meringue to soft peaks.
Your oven may run hot. Try baking the cake at a lower temperature (reduce by 25 degrees F).
Can I make the cake into 4 layers?
Yes, slice each cake equatorially to divide in half. You will need to increase the amount of heavy cream for the layers and exterior.
I can't find taro root, can I use something else?
You can substitute with purple sweet potato, or ube.
Other delicious cake recipes you may like
Be sure to check out these recipes:
Matcha Jasmine Cake with Yuzu Curd
Matcha Cupcakes with Whipped Cream Frosting
Let me know if you try out this recipe -- tag me on Instagram @siftandsimmer or leave me a comment/rating below!


Taro Coconut Cake
For accuracy and precision in baking recipes, use weight (metric) measurements when available.
Ingredients
Coconut cake:
- 4 egg whites room temperature
- 40 g granulated sugar
- ¼ teaspoon cream of tartar
- 4 egg yolks
- 40 g granulated sugar
- 40 ml coconut milk or whole milk
- 1 teaspoon coconut extract optional
- 40 ml vegetable oil
- 100 g cake flour
Taro paste filling:
- 1 batch blended taro paste divided in half (save half for the taro cream frosting)
- 3 g purple sweet potato powder optional, for colour
Coconut whipped cream:
- 50 ml heavy whipping cream (at least 36% milkfat) chilled
- ½ teaspoon coconut extract
- 1 teaspoon powdered sugar
Taro whipped cream frosting:
- 200 ml heavy whipping cream (at least 36% milkfat) chilled
- ½ batch taro paste from above
- 10 g purple sweet potato powder
Instructions
For key visual process photos, refer to the body of the blog post.
Make the coconut cake:
- Preheat oven to 325°F/163°C.
- Line two 6" round pans with parchment paper. Set aside.
- In a bowl, whisk together egg yolks with 40g granulated sugar, oil, coconut milk, and coconut extract.
- Sift in the cake flour over top of the egg yolk mixture and fold gently to combine, until there are no lumps.
- In a clean stand mixer bowl fitted with a whisk attachment, add in the egg whites and mix on low speed.
- Once the egg whites are slightly foamy with bubbles, add in a little cream of tartar (or lemon juice/vinegar).
- Gradually increase the speed of the mixer, and slowly pour in 40g granulated sugar.
- Continue to whip the egg whites until fluffy, shiny and reaches a soft peak. (The egg whites will form a curved tail at the end of the whisk).
- Fold about a third of the egg whites into the egg yolk batter.
- This will help to loosen up the egg yolk batter.
- Add the next 3rd of the egg white mixture, folding it into the egg yolk mixture.
- Continue to fold until all of the remaining egg white mixture is incorporated into the batter, taking care not to overfold.
- Divide and transfer the cake batter into two 6" round pans (use a scale to evenly distribute).
- Gently tap the pans a few times to release any trapped air bubbles.
- Bake at 325°F/163°C for 25-30 minutes, or until a toothpick inserted comes out clean.
- Remove the cakes from the oven and carefully drop them on the counter from a height of about 1' (to prevent too much shrinkage).
- Cool the cakes in the pan for about 2 minutes before transferring to a wire rack to cool completely.
Make the taro paste:
- Make the taro paste filling according to the recipe directions and add 3g purple sweet potato powder (optional, for colour).
- Cover and chill in the fridge until ready to use.
Make the coconut whipped cream:
- In a bowl, add the heavy cream, coconut extract and powdered sugar.
- Whisk until firm peaks.
- Transfer to a piping bag fitted with a round piping tip.
Make the taro whipped cream:
- In a bowl, add in the heavy cream and whisk until medium peaks.
- Add in the taro paste and purple sweet potato.
- Fold to combine the taro paste and cream, until incorporated.
Decorate the cake:
- Place one cake round onto a cake board.
- Pipe coconut whipped cream around the circumference of the cake.
- Add the taro paste to the centre and smooth with an offset spatula.
- Place the second cake round on top.
- Cover the entire cake with taro whipped cream and pipe decorations on top.
- Chill in the fridge until ready to serve.
Nutrition
The nutritional information provided should be considered as approximate and is not guaranteed. Please use your best judgment to ensure food is safely prepared and/or a good fit for your diet.


Heidi | The Frugal Girls
You decorated your coconut cake so beautifully. I especially loved the coloring of the cake from the purple sweet potato powder!
David @ Spiced
What a cool cake in terms of both flavor and appearance! The purple sweet potato powder is a nice trick. And I love anything coconut!!
Raymund | angsarap.net
I so love this cake, subtle nutty sweet flavour on a pillowy soft sponge cake, yum! Looking forward for more Asian style cakes
Ben | Havocinthekitchen
Beautiful cake, so simple but elegant. And this purple colour is wonderful!
Dawn
I don't think I've ever tried taro, but would certainly like to (especially after seeing this beautiful cake)! I really enjoy coconut desserts, too, so this sounds absolutely delicious to me!!
Tasia ~ two sugar bugs
Such a beautiful cake Michelle! Coconut cake is my very favorite and I love the addition of taro; that purple sweet potato powder is perfect for the lovely color.
Ann
Is the texture dense or similar to the chiffon fruit layer cakes from Chinese bakeries?
Michelle
Hi Ann, this taro coconut cake is similar to the chiffon fruit layer cake from Chinese bakeries.